2023. 4. 25. 20:12ㆍ연구 프로젝트/감성 자질 모델
[파이썬] KoELECTRA 사전 학습을 위한 데이터셋 제작
1. KoELECTRA 코드 출처
: GitHub - monologg/KoELECTRA: Pretrained ELECTRA Model for Korean
GitHub - monologg/KoELECTRA: Pretrained ELECTRA Model for Korean
Pretrained ELECTRA Model for Korean. Contribute to monologg/KoELECTRA development by creating an account on GitHub.
github.com
※시간 될 때마다 코드에 대한 자세한 주석은 계속 추가할 예정입니다.
2. 사전학습을 위한 데이터 구축-build_pretraining_dataset.py
*사전학습을 위한 데이터를 만들 시, build_pretraining_dataset.py 파일을 이용해 기존의 텍스트 데이터를 TFRecord 형식의 데이터로 저장함
-TFRecord: 이진 레코드 시퀀스를 저장하기 위한 간단한 형식으로, Tensorflow를 사용해 딥러닝 모델을 학습할 시 필요한 데이터들을 보관할 수 있는 바이너리 데이터 포맷을 지칭함
def main():
  parser = argparse.ArgumentParser(description=__doc__)
  parser.add_argument("--corpus-dir", required=True,
                      help="Location of pre-training text files.")
  parser.add_argument("--vocab-file", required=True,
                      help="Location of vocabulary file.")
  parser.add_argument("--output-dir", required=True,
                      help="Where to write out the tfrecords.")
  parser.add_argument("--max-seq-length", default=128, type=int,
                      help="Number of tokens per example.")
  parser.add_argument("--num-processes", default=1, type=int,
                      help="Parallelize across multiple processes.")
  parser.add_argument("--do-lower-case", dest='do_lower_case',
                      action='store_true', help="Lower case input text.")
  parser.add_argument("--no-lower-case", dest='do_lower_case',
                      action='store_false', help="Don't lower case input text.")
  parser.set_defaults(do_lower_case=True)
  args = parser.parse_args()

  utils.rmkdir(args.output_dir)
  if args.num_processes == 1:
    write_examples(0, args)
  else:
    jobs = []
    for i in range(args.num_processes):
      job = multiprocessing.Process(target=write_examples, args=(i, args))
      jobs.append(job)
      job.start()
    for job in jobs:
      job.join()
-위 파이썬 파일을 실행하면 argparse.ArgumentParser을 이용해 설정을 입력받고, write_example 함수를 병렬처리 방식으로 실행
-parser의 파라미터 중 num_processes의 값이 1이면 write_example 함수를 그대로 실행하지만, num_processes의 값이 1보다 크면 multiprocessing 함수를 이용해 주어진 값만큼의 병렬처리를 수행함
*build_pretraining_dataset.py에는 2개의 클래스가 정의됨: ExampleBuilder, ExampleWriter
1) ExampleBuilder: 입력 데이터를 변환
def __init__(self, tokenizer, max_length):
  self._tokenizer = tokenizer
  self._current_sentences = []
  self._current_length = 0
  self._max_length = max_length
  self._target_length = max_length
-클래스의 초기 입력값으로 토크나이저와, 최대 길이를 입력받음
(1) add_line 메소드
def add_line(self, line):
  line = line.strip().replace("\n", " ")  #문장 줄을 바꾸는 '\n'을 띄어쓰기로 변경, 여러 줄의 데이터를 한 줄로 변형함
  if (not line) and self._current_length != 0:  #현재 문장 길이가 0이 아니고 line이 None이 아니라면(데이터가 있다면)
    return self._create_example()  #_create_example 메소드 실행한 값을 반환
  bert_tokens = self._tokenizer.tokenize(line)  #tokenizer을 이용해 문장을 토크나이징
  bert_tokids = self._tokenizer.convert_tokens_to_ids(bert_tokens)  #토크나이징된 토큰들을 토큰ID로 변환
  self._current_sentences.append(bert_tokids)  #토큰ID로 변환된 현재 문장을 _current_sentences 변수에 저장
  self._current_length += len(bert_tokids)  #토큰ID로 변환된 현재 문장의 길이를 _current_length 변수에 저장함
  if self._current_length >= self._target_length:  #만약 현재 문장이 앞서 입력받은 최대 길이 값보다 길다면
    return self._create_example()  #_create_example 메소드 실행한 값을 반환
  return None
-현재 변환된 입력 데이터에 텍스트 데이터 한 줄을 추가함
(2) _create_example 메소드
def _create_example(self):
  if random.random() < 0.1:
    first_segment_target_length = 100000
  else:
    first_segment_target_length = (self._target_length - 3) // 2  #입력 데이터에 [CLS], [SEP] 토큰을 제외한 나머지 길이를 저장

  first_segment = []
  second_segment = []
  for sentence in self._current_sentences:
    if (len(first_segment) == 0 or len(first_segment) + len(sentence) < first_segment_target_length or (len(second_segment) == 0 and len(first_segment) < first_segment_target_length and random.random() < 0.5)):
      first_segment += sentence
    else:
      second_segment += sentence

  first_segment = first_segment[:self._max_length - 2]
  second_segment = second_segment[:max(0, self._max_length - len(first_segment) - 3)]

  self._current_sentences = []
  self._current_length = 0
  if random.random() < 0.05:
    self._target_length = random.randint(5, self._max_length)
  else:
    self._target_length = self._max_length

  return self._make_tf_example(first_segment, second_segment)
-텍스트 문장 데이터를 입력해 두 segment 문장으로 나눈 후, _make_tf_example 메소드를 실행한 결과를 반환
(3) _make_tf_example 메소드
def _make_tf_example(self, first_segment, second_segment):
  vocab = self._tokenizer.vocab
  input_ids = [vocab["[CLS]"]] + first_segment + [vocab["[SEP]"]]
  segment_ids = [0] * len(input_ids)
  if second_segment:
    input_ids += second_segment + [vocab["[SEP]"]]
    segment_ids += [1] * (len(second_segment) + 1)
  input_mask = [1] * len(input_ids)
  input_ids += [0] * (self._max_length - len(input_ids))
  input_mask += [0] * (self._max_length - len(input_mask))
  segment_ids += [0] * (self._max_length - len(segment_ids))
  tf_example = tf.train.Example(features=tf.train.Features(feature={
      "input_ids": create_int_feature(input_ids),
      "input_mask": create_int_feature(input_mask),
      "segment_ids": create_int_feature(segment_ids)
  }))
  return tf_example
-입력으로 받은 두 개의 텍스트 문장 데이터를 토큰화한 후, 이를 tf.train.Example 형식으로 변환하여 저장함
-{"string":value} 매핑으로 저장됨
2) ExampleWriter: 변환된 데이터를 TFRecord 형태로 저장
def __init__(self, job_id, vocab_file, output_dir, max_seq_length, num_jobs, blanks_separate_docs, do_lower_case, num_out_files=1000):
  self._blanks_separate_docs = blanks_separate_docs
  tokenizer = tokenization.FullTokenizer(vocab_file=vocab_file, do_lower_case=do_lower_case)
  self._example_builder = ExampleBuilder(tokenizer, max_seq_length)
  self._writers = []
  for i in range(num_out_files):
    if i % num_jobs == job_id:
      output_fname = os.path.join(output_dir, "pretrain_data.tfrecord-{:}-of-{:}".format(i, num_out_files))
      self._writers.append(tf.io.TFRecordWriter(output_fname))
  self.n_written = 0
-tokenization.py 파일에서 FullTokenizer 클래스 객체와, ExampleBuilder 클래스 객체를 가져온 후, ExampleBuilder 클래스의 메소드 'add_line'을 실행
(1) write_examples 메소드
def write_examples(self, input_file):
  with tf.io.gfile.GFile(input_file) as f:
    for line in f:
      line = line.strip()
      if line or self._blanks_separate_docs:
        example = self._example_builder.add_line(line)
        if example:
          self._writers[self.n_written % len(self._writers)].write(example.SerializeToString())
          self.n_written += 1
    example = self._example_builder.add_line("")
    if example:
      self._writers[self.n_written % len(self._writers)].write(example.SerializeToString())
      self.n_written += 1
3) write_examples 함수
def write_examples(job_id, args):
  def log(*args):
    msg = " ".join(map(str, args))
    print("Job {}:".format(job_id), msg)

  log("Creating example writer")
  example_writer = ExampleWriter(
      job_id=job_id,
      vocab_file=args.vocab_file,
      output_dir=args.output_dir,
      max_seq_length=args.max_seq_length,
      num_jobs=args.num_processes,
      blanks_separate_docs=args.blanks_separate_docs,
      do_lower_case=args.do_lower_case)
  log("Writing tf examples")
  fnames = sorted(tf.io.gfile.listdir(args.corpus_dir))
  fnames = [f for (i, f) in enumerate(fnames) if i % args.num_processes == job_id]
  random.shuffle(fnames)
  start_time = time.time()
  for file_no, fname in enumerate(fnames):
    if file_no > 0:
      elapsed = time.time() - start_time
      log("processed {:}/{:} files ({:.1f}%), ELAPSED: {:}s, ETA: {:}s, "
          "{:} examples written".format(
              file_no, len(fnames), 100.0 * file_no / len(fnames), int(elapsed),
              int((len(fnames) - file_no) / (file_no / elapsed)),
              example_writer.n_written))
    example_writer.write_examples(os.path.join(args.corpus_dir, fname))
  example_writer.finish()
  log("Done!")
-write_examples 함수를 실행하면 ExampleWriter 클래스 객체를 생성한 후, 해당 클래스의 write_examples' 메소드를 실행
3. 사전학습 시 데이터 불러오기-pretrain_data.py
*사전학습을 실행할 때, pretrain_data.py 파일을 이용해 사전학습에 사용할 TFRecord 형식의 데이터를 불러옴
from __future__ import absolute_import
from __future__ import division
from __future__ import print_function

import collections

import numpy as np
import tensorflow.compat.v1 as tf

import configure_pretraining
from model import tokenization
from util import utils

tokenizer = tokenization.FullTokenizer(vocab_file='vocab.txt')

# model inputs - it's a bit nicer to use a namedtuple rather than keep the
# features as a dict
Inputs = collections.namedtuple(
    "Inputs", ["input_ids", "input_mask", "segment_ids", "masked_lm_positions", "masked_lm_ids", "masked_lm_weights"])
1) get_input_fn 함수
def get_input_fn(config: configure_pretraining.PretrainingConfig, is_training, num_cpu_threads=4):
  """Creates an `input_fn` closure to be passed to TPUEstimator."""
  #pretrainingconfig: Defines pre-training hyperparameters

  input_files = []
  for input_pattern in config.pretrain_tfrecords.split(","):
    input_files.extend(tf.io.gfile.glob(input_pattern))  #config: 모델 설정 텍스트 json 형태로 담긴 파일

  def input_fn(params): #실제 input function
    """The actual input function."""
    batch_size = params["batch_size"]

    name_to_features = {
        "input_ids": tf.io.FixedLenFeature([config.max_seq_length], tf.int64),
        "input_mask": tf.io.FixedLenFeature([config.max_seq_length], tf.int64),
        "segment_ids": tf.io.FixedLenFeature([config.max_seq_length], tf.int64),
    }

    d = tf.data.Dataset.from_tensor_slices(tf.constant(input_files)) #데이터셋
    d = d.repeat()
    d = d.shuffle(buffer_size=len(input_files))

    # `cycle_length` is the number of parallel files that get read.
    cycle_length = min(num_cpu_threads, len(input_files))

    # `sloppy` mode means that the interleaving is not exact. This adds
    # even more randomness to the training pipeline.
    d = d.apply(
        tf.data.experimental.parallel_interleave(
            tf.data.TFRecordDataset,
            sloppy=is_training,
            cycle_length=cycle_length))
    d = d.shuffle(buffer_size=100)

    # We must `drop_remainder` on training because the TPU requires fixed
    # size dimensions. For eval, we assume we are evaluating on the CPU or GPU
    # and we *don"t* want to drop the remainder, otherwise we wont cover
    # every sample.
    d = d.apply(
        tf.data.experimental.map_and_batch(
            lambda record: _decode_record(record, name_to_features),
            batch_size=batch_size,
            num_parallel_batches=num_cpu_threads,
            drop_remainder=True))  #텐서플로우 데이터에 대해 기록들 디코딩
    return d  #데이터 형태 지정, 랜덤, 데이터 프레임워크? 반환

  return input_fn
-input_fn 함수를 실행 및 input_fun 함수는 tf.Example 형식의 데이터를 받아서 _decord_record 함수를 실행함
2) _decord_record 함수
def _decode_record(record, name_to_features):
  """Decodes a record to a TensorFlow example."""
  example = tf.io.parse_single_example(record, name_to_features)

  # tf.Example only supports tf.int64, but the TPU only supports tf.int32.
  # So cast all int64 to int32.
  for name in list(example.keys()):
    t = example[name]
    if t.dtype == tf.int64:
      t = tf.cast(t, tf.int32)
    example[name] = t

  return example
-tf.Example 형태의 TFRecord 파일을 가져온 후 이를 파싱(구문 분석)
-이후 딕셔너리 내 value 값이 tf.int64 형식이라면, TPU 사용 시 원활한 사용을 위해 tf.int32 형식으로 변환
3) features_to_inputs 함수
def features_to_inputs(features):  #input의 feature
  return Inputs(
      input_ids=features["input_ids"],
      input_mask=features["input_mask"],
      segment_ids=features["segment_ids"],
      masked_lm_positions=(features["masked_lm_positions"]
                           if "masked_lm_positions" in features else None),
      masked_lm_ids=(features["masked_lm_ids"]
                     if "masked_lm_ids" in features else None),
      masked_lm_weights=(features["masked_lm_weights"]
                         if "masked_lm_weights" in features else None))
4) get_updated_inputs 함수
def get_updated_inputs(inputs, **kwargs):  #입력 데이터 업데이트
  features = inputs._asdict()
  for k, v in kwargs.items():
    features[k] = v
  return features_to_inputs(features)
5) print_tokens 함수
ENDC = "\033[0m"
COLORS = ["\033[" + str(n) + "m" for n in list(range(91, 97)) + [90]]
RED = COLORS[0]
BLUE = COLORS[3]
CYAN = COLORS[5]
GREEN = COLORS[1]


def print_tokens(inputs: Inputs, inv_vocab, updates_mask=None):
  """Pretty-print model inputs."""
  pos_to_tokid = {}
  for tokid, pos, weight in zip(
      inputs.masked_lm_ids[0], inputs.masked_lm_positions[0],
      inputs.masked_lm_weights[0]):
    if weight == 0:
      pass
    else:
      pos_to_tokid[pos] = tokid

  text = ""
  provided_update_mask = (updates_mask is not None)
  if not provided_update_mask:
    updates_mask = np.zeros_like(inputs.input_ids)
  for pos, (tokid, um) in enumerate(
      zip(inputs.input_ids[0], updates_mask[0])):
    token = inv_vocab[tokid]
    if token == "[PAD]":
      break
    if pos in pos_to_tokid:
      token = RED + token + " (" + inv_vocab[pos_to_tokid[pos]] + ")" + ENDC
      if provided_update_mask:
        assert um == 1
    else:
      if provided_update_mask:
        assert um == 0
    text += token + " "
  utils.log(tokenizer.printable_text(text))
4. 토크나이징

*build_pretraining_dataset.py를 이용하면 사전학습 데이터를 TFRecord 형태로 저장 가능
※TFRecord란?
-이진 레코드 시퀀스를 저장하기 위한 간단한 형식
-Tensorflow를 사용해 딥러닝 모델을 학습할 시 필요한 데이터들을 보관할 수 있는 바이너리 데이터 포맷
*BERT 모델 계열에서 데이터 구축 시, 처음에는 토크나이저 진행

*이후 텍스트 문장이 정수 임베딩 벡터로 제대로 변환되는지 확인


-KoELECTRA에서 사용하는 WordPiece 토크나이저 이용해 Examplebuilder 클래스 객체 example 생성
-예시로 "안녕하세요, 대학생입니다."라는 텍스트 문장 추가
*토큰 임베딩 벡터 확인


-KoELECTRA 내 학습 데이터 구축하는 코드 일부를 사용한 결과, 주어진 문장에 대해 토큰 임베딩 벡터 및 세그먼트 임베딩 벡터를 잘 계산함
-각 단어에 대응하는 정수 인덱스를 부여해 토큰 임베딩 벡터 생성
-위 단계에서는 위치 임베딩 벡터를 계산하지 않음
*토크나이저 새로 만들지 않고 이미 학습된 토크나이저 사용한 이유

-원작자가 공유한 코드 내에서는 tokenization 파일이 존재 및 토크나이저 역시 처음부터 동시에 학습 가능
-그러나 단순히 tokenization.py를 이용해 토큰화를 진행할 경우 아래의 문제 발생

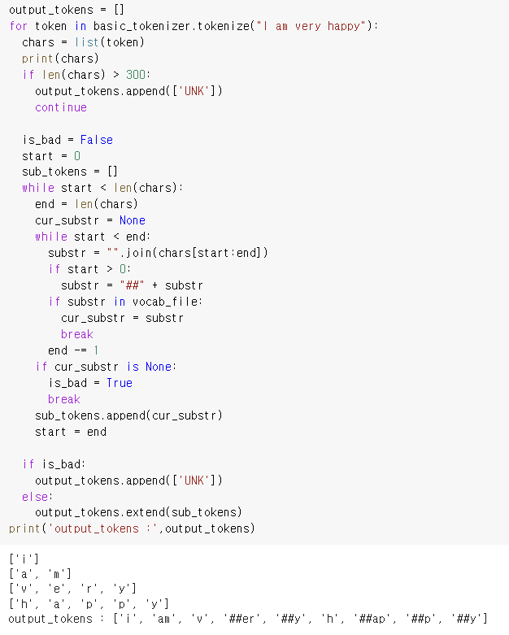
-한글 문장으로 토큰화 진행 시, 왼쪽과 같이 자음 모음 전부 분리되는 현상 발생
-영어 문장으로 토큰화 진행 시, 단어로 토큰화가 진행되지 않고 알파벳 단위로 토큰화가 진행됨
5. 적합한 한국어 감성 사전
*KoELECTRA 토큰화 단위에 맞는 한국어 감성 사전 필요

-한국어 감성 사전은 참고 논문에서와 같이 KOSAC 사용
-하지만 한글은 특히나 품사에 따라 의미가 달라지므로 품사를 구분할 수 있어야 함

-예시: 같은 "가능"이라는 단어여도 어떤 품사냐에 따라 단어의 뜻 및 감성 값이 달라짐
-그러나 KoELECTRA 토크나이저로는 각 토큰의 품사를 알아낼 수 없음
=> KoNLPy와 같은 한국어 형태소 분석기 사용해, 주어진 입력 문장의 각 단어들의 품사를 분석할 수 있도록 계획
※감정 사전 오류
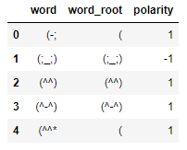
*KOSAC에서 잘못 라벨링된 단어 존재

-원래 KOSAC 사전을 보면 '불행'이라는 단어는 긍정으로 분류됨
-'불행감을 벗어나'라는 문장에서 '불행'이라는 단어를 추출했고, '불행감에서 벗어나'라는 문장이 긍정으로 분류됐기 대문에 '불행'도 똑같이 긍정으로 분류되었다고 추정
=> 위 문제 해결하기 위해 또 다른 한국어 감성사전 KNU와 비교

*KNU: 특정 분야에서 사용되는 긍부정어보다 인간의 보편적인 기본 감정 표현을 나타내는 긍부정어로 구성된 한국어 감성 사전
-국립국어원 표준국어대사전의 뜻풀이 분석을 통해 긍정 vs. 부정 추출
-SentiWordNet 및 SentiNet-5.0에서 주로 사용되는 긍정 및 부정어 번역
-최근 온라인에서 많이 사용되는 축약어 및 이모티콘 존재
-다양한 n-gram, 관용구, 문형, 축약어, 이모티콘 등에 대한 긍정, 부정, 중립의 판별 및 정도(degree) 값 계산: 각 단어의 정도 값은 -2(매우 부정), -1(부정), 0(중립), 1(긍정), 2(매우 긍정)으로 분류됨
※KNU 한국어 감성 사전 개발 방법
-표준국어대사전을 구성하는 형용사, 부사, 동사, 명사의 모든 뜻풀이에 대한 긍정, 부정, 중립으로 분류하기 위해 Bi-LSTM 사용
-최소 3명의 평가자들이 각 단어의 긍정, 부정, 중립을 판별하고, 이의가 있을 경우 토론을 통해 합의를 이룸


-잘못 라벨링된 값을 수정하기 위해, KOSAC 감성 사전에는 POS(긍정)으로, KNU 감성 사전에서는 부정으로 분류된 단어들 정리
-단, KNu 감성 사전의 'word_root' 열을 기준으로 두 데이터 프레임의 병합을 시도하면 같은 단어에 대해서도 다른 단어가 매칭되어 다른 감정 값을 갖는 경우 발생
=> KNU 감성 사전의 'word'열을 기준으로 정함
6. 사용할 감성 값
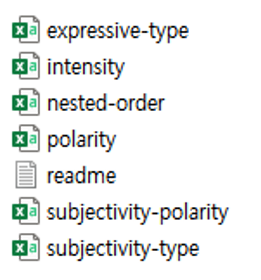
*KOSAC: 총 6가지의 감성 값으로 구분됨
① Expressive-type: 해당 언어가 발화자로부터 어떤 방식으로 표현되는지를 표기
(ex) direct-explicit, direct-speech, direct-action, indirect, writing-device
② Intensity: 해당 언어가 가진 주관적인 표현의 정도 표기
③ Nested-source: 중첩된 출처. 저자, 화자, 경험자 등 하나 이상의 출처가 산정되는 발화 사건이나 개인적인 상태를 표기
④ Polarity: 해당 언어의 극성(긍정 or 부정)
⑤ Subjectivity-polarity: Subjectivity-type과 하나의 통합된 값을 구성, 일반적인 극성 표현 방법과 다르게 산정
(ex) positive, negative, complex, neutral
⑥ Subjectivity-type: 해당 언어가 어떤 주관적인 감정에 속하는지 표기
(ex) judgement, argument, intention, agreement, speculation, emotion, others
∴참고 논문에서는 intensity, polarity 값 사용
'연구 프로젝트 > 감성 자질 모델' 카테고리의 다른 글
| [파이썬] KoELECTRA 기반의 감성 자질 모델 구현 도전기 #2-3-2 (0) | 2023.05.18 |
|---|---|
| [파이썬] KoELECTRA 기반의 감성 자질 모델 구현 도전기 #2-3-1 (2) | 2023.05.14 |